Before you can start chatting or calling someone in Skype, they first have to be on your contact list. Luckily adding a contact is very easy and straight forward process. In the top left corner of Skype is a search bar, type the person’s name in the search bar and then click the “Search Skype” button that appears. This will bring up a list of people with that name and the first person should be the one you are looking for. To verify this, click on the person’s name under the search bar and then again in the middle of the screen to bring up their contact profile. Double check that the Skype name listed here is the one you are searching for. Now you can close the contact profile and click the “Add to contacts” button. Once your contact approves you, you will be able to call them from your contact list.
Downloading & Installing Skype
Skype is an excellent program to chat and video chat with people around the world. It makes it extremely easy to keep in touch with people at no cost to either person. But before you actually start using Skype, you first have to install it on your computer.
To get Skype, visit http://www.skype.com/en/ and click on the “Download Skype” button in the middle of the page. This will take you to a page to select what device you are downloading Skype for.

By default it should already be on the Computer option, if not you can click on it. Now click on the “Get Skype for Windows desktop button” to start the download. Once the download is complete run the downloaded file, SkypeSetup.exe by clicking on it.
From here, select the language you want and if you want Skype to run when your computer is turned on. I prefer to uncheck that box because I don’t use Skype very consistently but the choice is yours. By clicking on “More Options” you can choose where to install Skype and if you want a desktop icon. It is okay if you leave these as they are. Now click the “I agree – next” button to accept the Terms of Use and continue with the installation.
On the next page you can choose to install Skype Click to Call. This will allow you to click on phone numbers to call them through Skype, much like you can on a smartphone. I do not use Skype to make phone calls so I uncheck this box. Now click “Continue” to move to the next page.
On this page you should uncheck both boxes to ensure that you don’t change your homepage or default search engine. Click the “Continue” button to start the actual installation of Skype. This may take a few minutes so be patient.
Congratulation! Skype is now installed. It should start automatically after installing and look something like this.

I want to take this opportunity to clear something up about closing Skype. If you close it by clicking on the red X at the top right corner, the window will close Skype as whole will not. You can notice that the icon will still be on the taskbar. To completely quit and close Skype you will have to right click the icon on the taskbar and select “Quit Skype”.
Importing a CD with iTunes
iTunes makes it really easy to take any CDs that you already have and put them into your iTunes library. Just follow these steps:
- Open iTunes.
- Place the CD into your optical drive (the one that a CD/DVD fits into).
- If iTunes doesn’t automatically change to show all the songs on the CD, click on the Library Selector in the top left of the window (it most likely says Music right now) and select the title of the CD.

- Now click the Import CD button that is toward the top right of the window.
- Click OK on the Import Setting window that will pop up.
- Now iTunes will begin importing your CD. You can watch its progress in the current window you are in or you can go do something else in iTunes and watch the progress in the top window.
- Once it is done importing the CD you can take the CD out of the optical drive.

Congratulations! You now imported a CD into your iTunes Library. You can do what ever you want with this music now: put it into a playlist, burn it to a CD, sync it to your iPod, etc…
Redeeming iTunes Gift Cards
iTunes gift cards are a common gift in today’s society. They allow you to buy anything in the iTunes store from music to videos to apps. Before you can use the gift card you first have to redeem it. Redeeming a gift card places the dollar amount of the gift card as credit in your iTunes account. Redeeming a gift card is easy, just follow these steps:
- Open iTunes
- Go to the iTunes Store by clicking on the button labeled “iTunes Store” in the top right of the window.
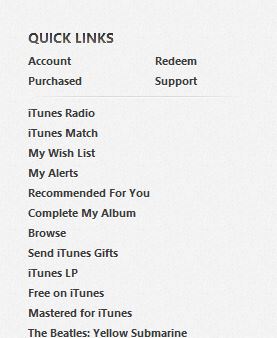
- Toward the bottom right of the window is a section called “Quick Links”. Click on the “Redeem” link in that section.

- If you aren’t already logged in with your AppleID it will ask you to log in.
- Now enter the code that can be found on the back of your gift card and click the Redeem button.
The amount of the gift card should now be added to amount of money that can be seen next to your AppleID username toward the top of the window. Now you no longer need the physical gift card because it is associated with your account. You can use this money from any of your devices (Computer, Phone, Tablet) as long as you are signed in with your AppleID.
How to Open iTunes and Check for Updates
Before we start using iTunes, we first want to make sure that we can open it and that we are using the most current version. Luckily it very easy to do both. First check if iTunes has been placed on the Desktop or if it is has been pinned to the taskbar (the strip of icons to the right of the start button). Both options are shown below:
![]()
You can open iTunes by either clicking on the icon in the taskbar or by double clicking the icon on the Desktop.
If it can’t be found on the Desktop or in the taskbar, then you can search for it in the start menu. To do this start by clicking on the start button, it can be found on the very bottom left hand corned of the Desktop. Once you click on it you should be see something like this.

Once the start menu is open, type “itunes” into the search bar that is labeled “Search programs and files”. Once you do this the list of programs will be replaced with search results. iTunes should be on the very top because it exactly matches what you searched. All you have to do is click on it to open it.

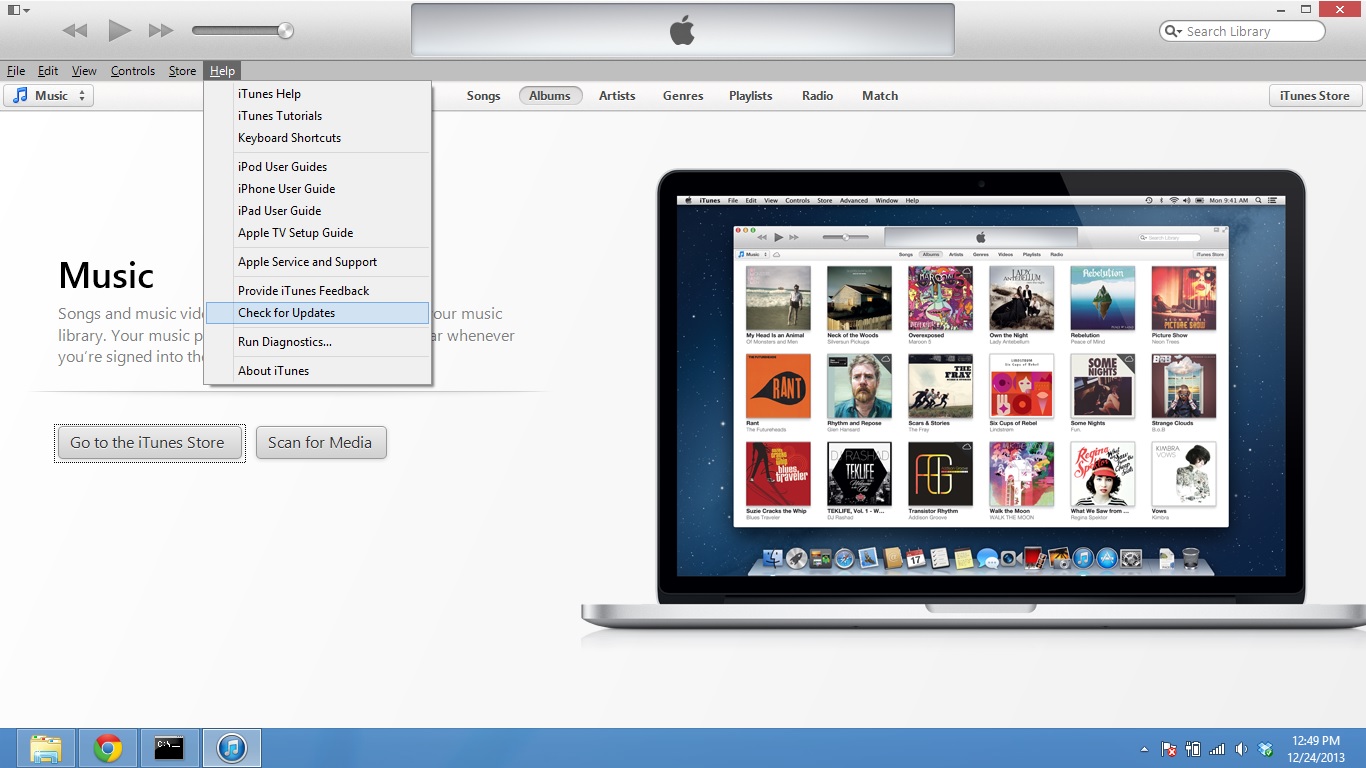
Once iTunes opens it will usually remind you if there is an update that you should download. But just in case it doesn’t remind you here are a few simple steps on how to check if you are using the latest version of iTunes.
- Press the alt key, this will make a list of menus appear toward the top of the window.
- Click on the Help menu
- Select Check for Updates
iTunes will now check for any updates. If it is already up-to-date, a window will pop up saying that the current version of iTunes is the current version. If there is an update available, it will ask you to download and install the update. Now that we have the latest version of iTunes up and running. We can start to use it and all of its features.
Ways to Select Multiple Files
There are many times that you may want to move, copy, or delete more than one files. Rather than doing this to each file one-by-one, there are a few ways to select (you may also know this as highlighting) multiple files. There are three main ways to do this:
- Click-and-Drag Highlight
You can click and drag a box around around the files that you want to highlight. This is a really good method for selecting a group of files that are all right next to each other.

- Control Click
Holding control essentially has files remain highlighted as you click elsewhere. After selecting one file, you can hold control (on the bottom left of the keyboard) and click on other files to select them. This will keep any previously selected files highlighted and highlight the files that you click on. While holding control if you select any file that is already highlighted, that file while will be deselected. This is a good method for selecting files that may not be grouped close together.
- Shift Click
Holding shift (located directly above the control key) will allow you select all of the files between the file you previously highlighted and the one you click on. This means that if you click on the first file in a folder, hold shift and click on the second to last file in the folder, every file will be selected except for the very last one.
- Control + A
If you want to select every file within the window you are viewing, you can simply hold control and press A. This will highlight everything!
These can all be used to select multiple folders, or even a combination of folders and files. Any of these methods can be used alongside the others. It is possible to select a large group of files by highlighting them using the click and drag, and then selecting a few more by control-clicking. Try them all out.
